Two phases of the cannabis cultivation process that are often overlooked, especially by inexperienced cultivators, is the drying and curing processes. These two phases do not receive nearly enough attention by cultivators, presumably because those same cultivators are too focused on the seed, clone, vegetative, and flowering stages. It makes sense why those other phases receive so much attention, however, cultivators should not overlook the importance of proper drying and curing.
Just because a cannabis plant is ready for harvest does not mean that the hard work and attention to detail is over on the part of the cultivator. It’s not a matter of just chopping down a plant, hanging it upside down for a time, and then packaging the cannabis for transport and use. Proper drying and curing are absolutely vital to the overall harvest process, and an entire cannabis crop can be ruined if the drying and curing aren’t handled properly.
Proper drying and curing both directly affect the smell and taste of the final product. If you have ever acquired cannabis that looked amazing, yet tasted, smelled, or smoked terribly, chances are the cultivator did not dry and cure it properly. Learning how to properly dry and cure cannabis is something that every new cultivator should educate themselves on as soon as possible, preferably before they start cultivating plants in their garden.
Drying and curing cannabis is a process, and requires ongoing education, however, the right way to do it is more straightforward than many people might think. Curing cannabis takes particular attention to detail and ongoing effort. How to dry and cure cannabis, and how long to cure cannabis specifically, is discussed in detail below.
How Long Does It Take To Dry Freshly Harvested Cannabis?
When you’ve determined it’s the right time to harvest your cannabis and the plant is actually chopped down, the drying process begins. The chopping process can be all at once, or it can be staggered. Regardless of which route a cultivator decides to go, many novice cannabis cultivators rush the drying process, which is unfortunate.
Various methods exist to dry cannabis as fast as possible, such as the use of a dehumidifier which pulls moisture out of the buds within 2-3 days. It can be very tempting to get a harvest to market and/or to the point of consumption as soon as possible, however, cultivators should not give in to those temptations. Great cultivators are patient and methodical regarding their strategy for drying their buds.
Drying cannabis too quickly can result in the harvest being less potent than it would have been if the harvest was dried longer. It can also make the cannabis flower taste harsher, put off less of a smell, and lessen the cannabis flower’s shelf life. If you see an amazing sample of flower at a dispensary and it has no smell, it’s likely due to the cultivator drying the cannabis too quickly.
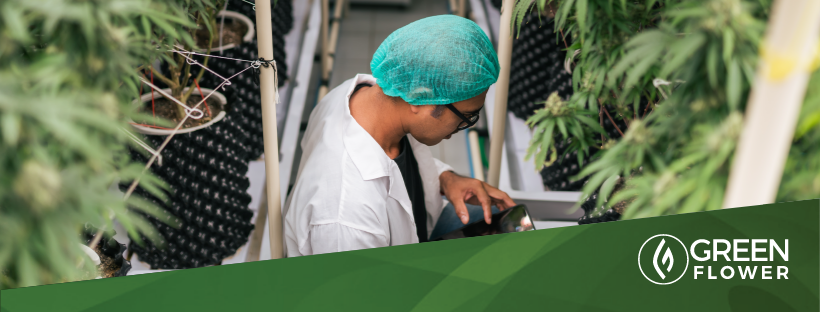
Expert cultivators like Green Flower’s Derek Gilman recommend drying cannabis in a cool dark room via the use of drying racks. Gilman recommends cutting bud-filled branches off the plant and immediately putting the branches in the drying room. Some cultivators will cut all of the leaves off of the buds and branches prior to the initial storage, however, it’s best to leave them on for the first round of the drying process.
Both temperature and humidity play important roles here. The room that the branches are drying in should be at a humidity level of 62 percent and have a cool temperature (60-65 degrees). Gilman recommends leaving the branches in the drying room for 5 days. After the 5th day, the cultivator should pull the branches off the drying racks to trim off the excess water leaves, then put the cannabis back in the drying room for another week. After that, the mostly-dried cannabis is ready for weeks of curing.
What’s ‘Curing’ & How Long Is The Process Of Curing Buds?
Beginner cannabis cultivators often incorrectly think that just because cannabis is mostly dry that it is ready to consume. That is true even for some newbie cultivators who took the time to properly dry their cannabis for two full weeks. Consuming the cannabis buds at this point is not optimal.
The mostly-dried cannabis buds still have a few weeks to go before being completely and properly dried, and thus, optimal for consumption. The next step in the process after the drying phase is for the cannabis buds to cure. ‘Curing’ cannabis involves putting the buds into a container, often an air-tight mason jar, and letting them sit for three full weeks. Much like the drying branches, the jars of curing cannabis should be placed in a cool dark room.
When the buds have completed their cycle in the drying room they are removed from the branch and placed into a container. At this point, the buds still have a little moisture in them and that particular moisture needs to be released slowly and evenly. If the buds are not in a container, this last amount of moisture exits the buds too quickly and that harms the quality of the buds.
Some cultivators will be tempted to put their mostly-dried cannabis in a bag that incorporates vacuum sealing to cure, however, that route should be avoided. The mostly-dried cannabis needs to be exposed to fresh air on a daily basis while curing to remove the last bit of moisture from the buds. Buds that are locked in a vacuum-sealed bag will sit in the moisture-rich air and never properly cure. If they sit too long, mold and mildew can develop.
Mason jars are a much better route compared to a vacuum-sealed bag. Place the buds in the jar and open the jars once a day to release the moisture-rich air. The release of air via the opening of the jars is a process often referred to as ‘burping’ the jars. Each day the jars are opened they should emit an increasingly more distinct smell. At first, the jars will smell very fresh and green, but by the end of the third week, the cured weed should emit the aroma that the strain is commonly associated with (sweet, fruity, earthy, piney, gas, etc.). Curing cannabis for three weeks is ideal for most harvests, however, some strains could take longer, so let your nose be your guide.
How To Make Auto-Curing Buckets
Mason jars work well for smaller harvests, however, if a cultivator scales up the size of their garden and yields larger harvests, there’s a better solution for tackling the curing process that large-scale cultivators should consider. Twisting off the lid of one mason jar a day doesn’t take much time. Twisting off the lid of dozens or even hundreds of jars every day can be quite time-consuming.
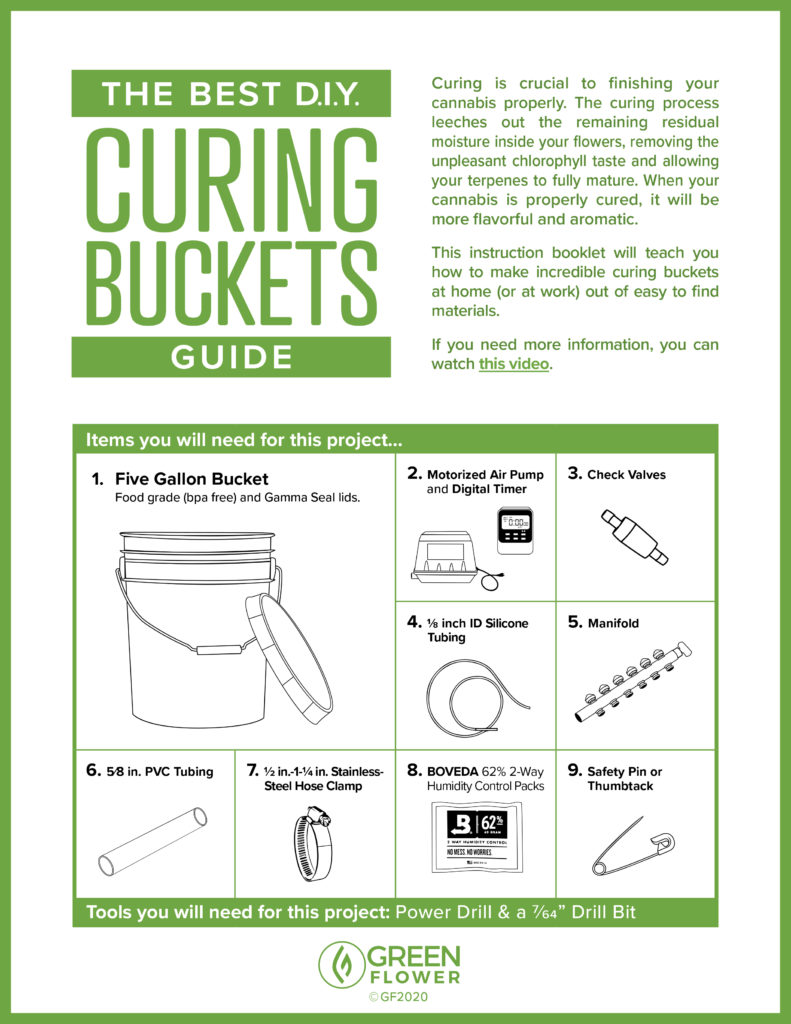
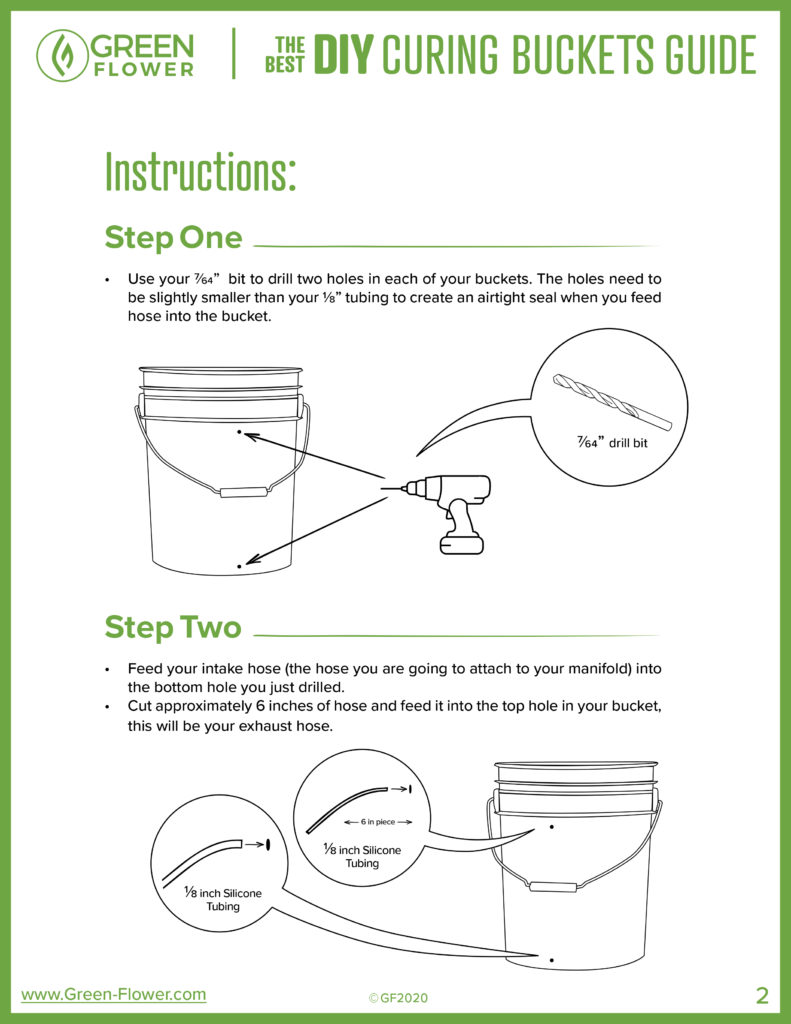
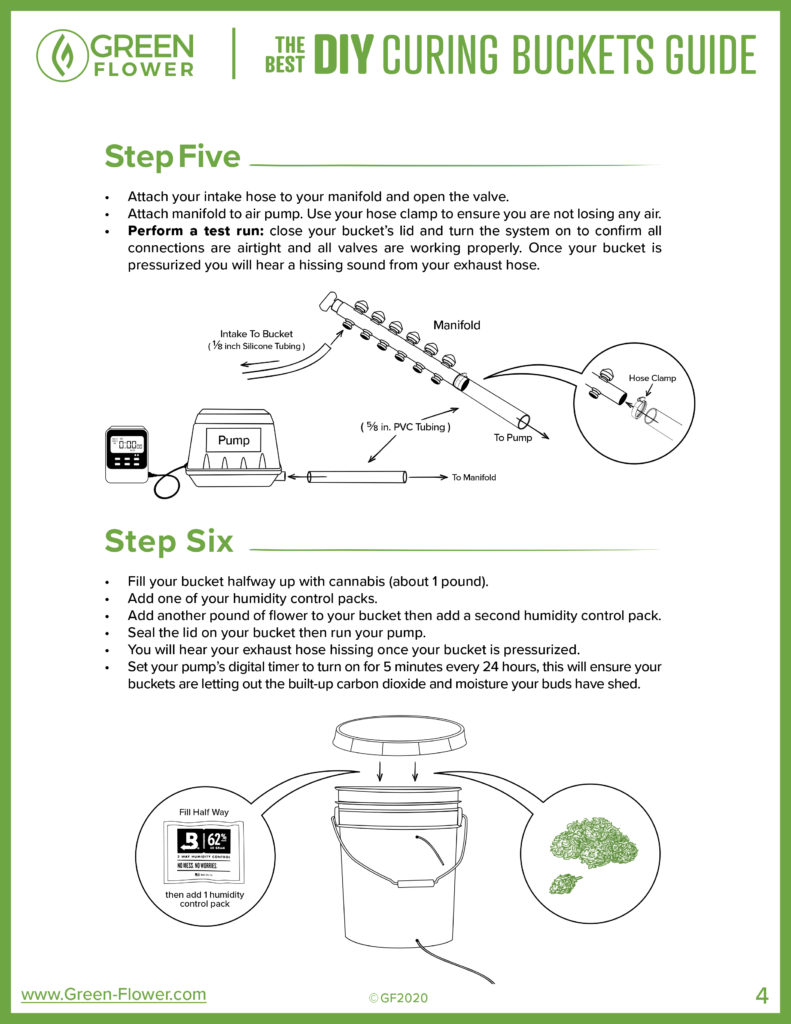
A great way to auto cure large quantities of cannabis is through the use of ‘auto-curing buckets.’ Curing buckets are plastic buckets, typically 5 gallons in size, that are modified with an intake and exhaust tube. Any size bucket will work, although 5 gallons is the most common and typically holds up to 2 pounds of curing cannabis flower.
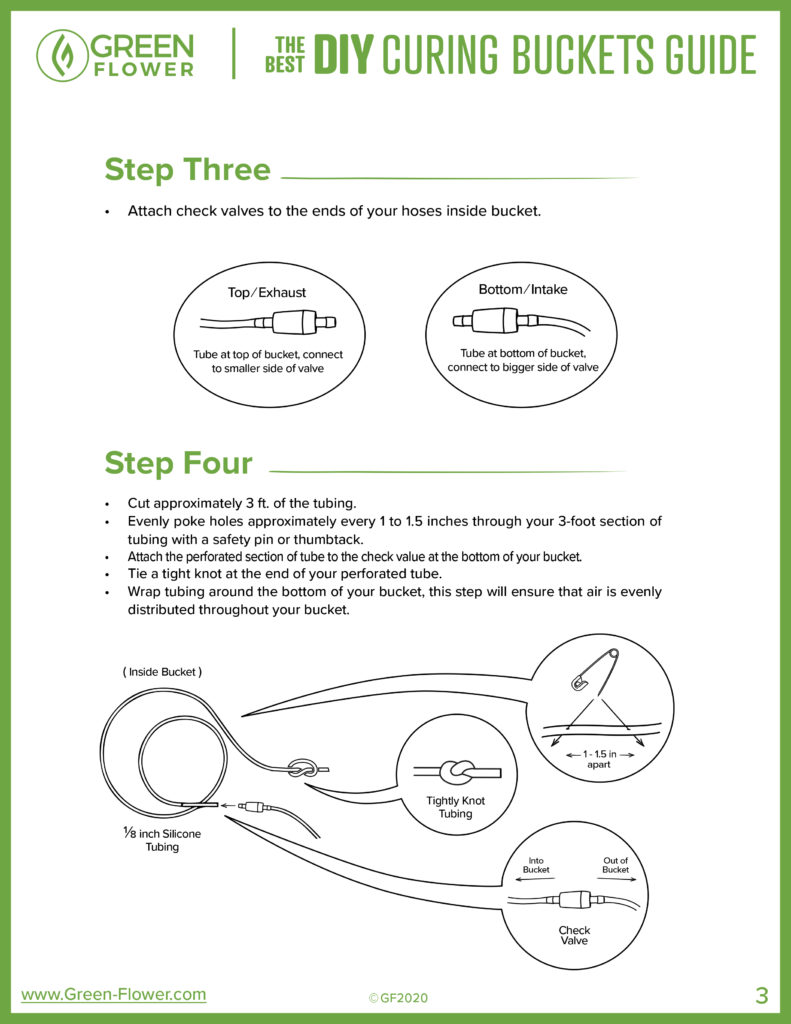
The exhaust tubes have check valves on them that allow air to pass through as pressure builds. Each bucket is fitted with a gamma seal lid so that the only way for air to go in or out of the bucket when the lid is closed is through the intake and exhaust tubes. The lower tubes are then attached to an air pump, similar to an air pump that is used for fish aquariums. As air is pumped into the bucket it travels across the surface area of the buds and then leaves the bucket via the exhaust tube, taking the moisture with it.
This curing process is the same concept as opening the lid of a mason jar to ‘burp’ the jar, releasing moisture-rich air, and letting in fresh air. It is just done so in an automated, more-efficient manner. Rather than opening jar after jar, day after day, the air pump can be put on a timer and the entire process automated.
By using the auto cure bucket method, cultivators can significantly cut back on their time and effort. Obviously, there’s the initial effort to modify the buckets. However, after the bucket is modified it’s just a matter of plugging tubes to the air pump going forward. Also, the buckets provide an added benefit in the form of long term storage since there’s no need to transfer the properly cured buds to another container.
One thing that many expert cultivators recommend is incorporating the use of humidity control packets in the containers that store cured cannabis. Companies like Boveda make humidity control packets for this purpose.
Just as the drying room should be at a 62 percent humidity level, so too should the long-term storage containers. That can be achieved via the use of two-way humidity control packets. Two-way humidity control packets absorb moisture if the humidity level is too high, and release moisture when the humidity level is too low.
Drying and curing cannabis is not a particularly difficult task but it does require daily attention without an auto curing bucket system.
Download The Best DIY Curing Buckets Guide PDF

1 comment
What is the optimal temperature for the drying and curing process?